


Previous tutorial : Installing Zimbra 6.0.4 on openSUSE 11.1 64 bit – Part 1
CONFIGURING LOCAL DNS SERVER
Configuring local DNS server with openSUSE 11.1 should be similar as configuring DNS Server on openSUSE 11.2. You may found an annoying bug if you haven’t pick an online update and use the package on the DVD installation, but it could be fixed with a small changes. I will show you the detail on
Zimbra need an A & MX records that pointing to it’s IP Address. We could use/modify existing DNS records to meet with our requirement but I would prefer to installing local DNS server for it’s flexibility. If you’re currently using an existing & running mail server and need to replace it with Zimbra, you should not change any MX entry before completing and testing the configuration. Incomplete configuration on production mail server may impact to bounce mail, so, we need a local DNS server to prevent the impact and to do a full test before activating mail server for production use.
Setting up a DNS server on openSUSE for Zimbra requirement should be easy by using YAST. Below is a step by step, please change the IP and host name to meet with your environment on previous tutorial.
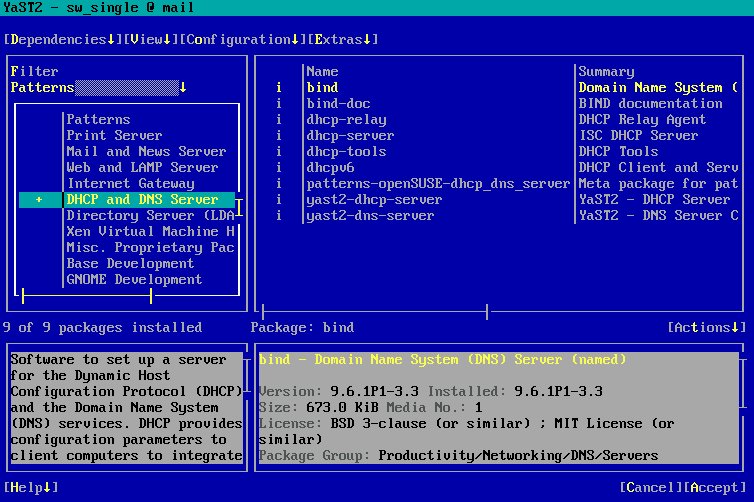
- Install DNS server package. Click YAST | Software | Software Management, choose Patterns on Filter option and then find & install the DHCP & DNS Server pattern. You could also installing the pattern by using zypper : zypper in -t pattern dhcp_dns_server. If you wish to install the DNS without DHCP package, just choose & install bind, bind-doc and yast2-dns-server

YAST software Management - Go to YAST | Network Services | DNS Server
- Click Next on first configuration wizard : Forwarder List

DNS Server wizard : Initial Windows - Add a new Zone. Write your domain on Zone name, choose type of zone (Master) and then click Add

Add DNS Zone - Click Edit to modify dns zone
`

- Just leave the first tab (Basics) as is. Click the second tab : NS Records
- Write ns1 on Name Server to Add option and then click Add. YAST should be enough clever to give the records a fully qualified domain name and autocompleting the entry
`

- Move to the third tab, MX Records. Write the Zimbra host name (see your configuration on first tutorial) on Address option, Give it a priority number (lower means highest priority) and then click Add. YAST will autocompleting the entry
`

- Leave the fourth tab as is, except you need to modify to SOA option
- Move to final tab. Write ns1 on Record key, choose A (Address Records) as records type and write Zimbra IP on records value. Click Add.Still on final tab (Records), make a second Address Records for Zimbra hostname. Write mail on Record key, choose A (Address Records) as records type and write Zimbra IP on records value and then click Add
`

- Click OK
- Click Next
- Choose On : Start up now and When Booting and then click Finish. The last option will ensure the DNS service will be active on boot process
`

- If you installing DNS package from DVD, you may hit an annoying bugs as below. Just Click OK and then No on the second confirmation window.
`

`

- Solved the bug by edit /etc/named.conf and mark the line (give it a # sign) contains “include /etc/named.conf.include”. Actually, bug has been fixed with an online update.
`

- Restart the DNS service
[code language=’cpp’]
service named restart
service named status
[/code] - Testing the DNS records using nslookup : nslookup ns1.domain.tld and nslookup mail.domain.tld. DNS Server should be response with the Zimbra IP.
`


Continue to the third part of tutorial : Installing Zimbra 6.0.4 on openSUSE 11.1 64 bit – Part 3, Installing Zimbra Binary Installer


thank’s for your solution……. 🙂
thank’s for your solution……. 🙂