


/* Note : It’s the second article regarding PXE Boot Setting. Please refer to Tutorial : openSUSE Network Install over PXE-Boot Part I for beginning configuration and Description about PXE Boot. */
PREPARING DHCP SERVICE
DHCP (Dynamic Host Configuration Protocol) needed for supply the correct information for PXE Boot client.
- Install DHCP Service
[code language=’cpp’]
zypper in -t pattern dhcp_dns_server
[/code] - Move the default DHCP configuration. We will used the custom configuration
[code language=’cpp’]
mv /etc/dhcpd.conf /etc/dhcpd.conf.original
[/code] - Create a new /etc/dhcpd.conf with text editor and copy-paste the configuration below
[code language=’cpp’]
# dhcpd.conf
#
# Sample configuration file for ISC dhcpd
## option definitions common to all supported networks…
#
# All of this happens behind the firewall, and the whole domain
# is made-up anwyay, so this is mostly fluff.
#
option domain-name “vavai.net”;
# We don’t have Nameservers… so let’s just forget this item
#option domain-name-servers ns1.networkboot.org, ns2.networkboot.org;
default-lease-time 600;
max-lease-time 7200;
# if you do not use dynamical DNS updates:
#
# this statement is needed by dhcpd-3 needs at least this statement.
# you have to delete it for dhcpd-2, because it does not know it.
#
# if you want to use dynamical DNS updates, you should first read
# read /usr/share/doc/packages/dhcp-server/DDNS-howto.txt
ddns-update-style none; ddns-updates off;
# If this DHCP server is the official DHCP server for the local
# network, the authoritative directive should be uncommented.
#authoritative;
# Use this to send dhcp log messages to a different log file (you also
# have to hack syslog.conf to complete the redirection).
log-facility local7;
# We only want to respond to PXE DHCP requests
allow booting;
# define rules to identify DHCP Requests from PXE and Etherboot clients.
class “pxe” {
match if substring (option vendor-class-identifier, 0, 9) = “PXEClient”;
}
class “etherboot” {
match if substring (option vendor-class-identifier, 0, 9) = “Etherboot”;
}
# This is our subnet for PXE boot/installation.
subnet 192.168.0.0 netmask 255.255.255.0 {
option broadcast-address 192.168.0.255;
pool {
range 192.168.0.101 192.168.0.150; # only need a few addresses
default-lease-time 180; # no long lease time required for booting
max-lease-time 360; # booted system does its own dhcp request
server-name “192.168.0.8”; # This happens to be the IP of this server too
next-server 192.168.0.8; # Address of the TFTP server
filename “pxelinux.0”;
allow members of “pxe”; # only respond to PXE requests
allow members of “etherboot”; # allow etherboot, too
}
}
[/code] - Make a proper change to /etc/dhcpd.conf, especially the IP Address of DHCP Server. In this scenario, I’m using address 192.168.0.8. If you used another subnet, change the subnet, broadcast and range address.
- Edit /etc/sysconfig/dhcpd and activate the ethernet used for listen DHCP request. If you confused which ethernet will be used, try with ANY 😀 as suggested on the configuration. I’m using eth0 so part of my configuration look like this :
[code language=’cpp’]
# Examples: DHCPD_INTERFACE=”eth0″
# DHCPD_INTERFACE=”eth0 eth1 eth2 tr0 wlan0″
# DHCPD_INTERFACE=”internal0 internal1″
# DHCPD_INTERFACE=”ANY”
#
DHCPD_INTERFACE=”eth0″
[/code] - Start/Restart DHCP Service
[code language=’cpp’]
service dhcpd restart
[/code]
PXE BOOT CONFIGURATION
- Copy all of these file from [PATH-OF-DVD-CONTENTS]/boot/i386/loader into /srv/tftpboot : message, initrd and linux
- Copy file : [PATH-OF-DVD-CONTENTS]/boot/i386/loader/isolinux.cfg into /srv/tftpboot/pxelinux.cfg/. Rename it into default
- Restart the DHCP Service
[code language=’cpp’]
service dhcpd restart
[/code]
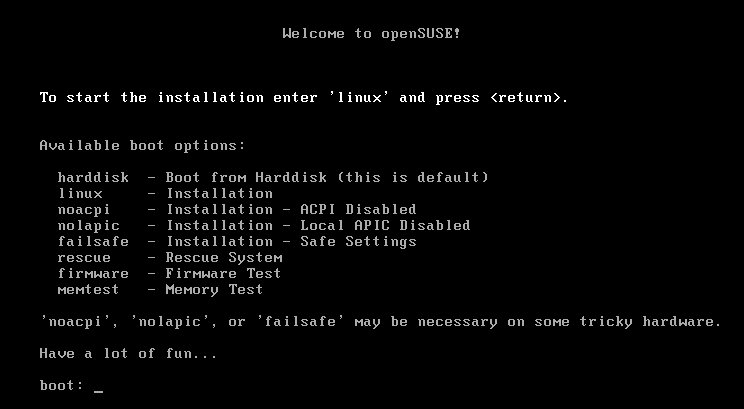
USING PXE BOOT FOR INSTALLATION
- Prepare a PC with attached Network card. This computer will be used as client for PXE Boot Installation
- Change BIOS Setting, activating Boot from LAN and switch the Boot Default Priority to boot from LAN
- Restart the computer. It will boot from LAN and display the installation option.
`


I’m a newbie on openSuse and linux, but this project is teaching me a lot. At this point I seem to be stuck. DHCP starts right away on the client (Toshiba 3500 Tablet PC) and the correct server address is shown but the TFTP dies. I get a message PXE-E32 TFTP timeout. Is there a firewall blocking me on the server machine? (Server is a Dell with openSuse 11.1) Can you get me unstuck? 🙂
Thanks! Rick
Thanks a lot for sharing the info on PXE.
I have to try this with dhcp server on windows, how do i go ahed.
where in we have no control on MS dhcp server.